How to Point a Domain Name to Web Hosting: Complete Step-by-Step Guide for Beginners
Have you purchased a domain name and web hosting but don’t know how to connect them? Don’t worry. Pointing a domain to your hosting account may sound technical, but once you understand how DNS and nameservers work, the process becomes much easier.
What You Will Learn
- What a domain name is
- What web hosting is
- How domains and hosting work together
- What DNS means
- What nameservers are
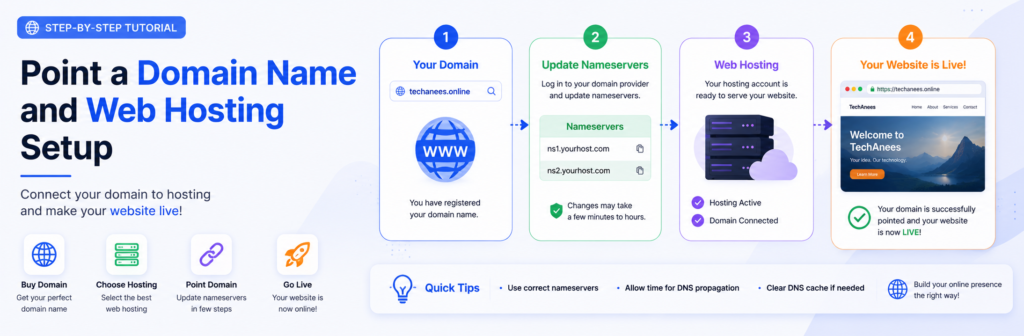
- How to point a domain using nameservers
- How to point a domain using an A record
- How to add a
wwwrecord - What DNS propagation means
- How to check whether your domain is connected
- Common domain connection problems
- Frequently asked questions
What Is a Domain Name?
A domain name is the human-readable address people use to visit a website.
For example:
google.com
youtube.com
techanees.online
Instead of asking visitors to remember a numerical IP address, a domain gives your website an easy-to-remember name.
Think of a domain name as the address of your website.
For example, if your website were a physical shop, the domain name would be the shop’s street address that tells customers where to find you.
What Is an IP Address?
Every server connected to the internet has an IP address.
An IPv4 address may look something like:
192.0.2.1
These numbers identify a particular server or network location.
However, remembering IP addresses for every website would be difficult.
That’s why domain names exist.
When someone enters:
techanees.online
their browser uses the Domain Name System (DNS) to find where that domain should connect.
In simple terms:
Domain → DNS → Server → Website
What Is Web Hosting?
A domain name alone does not normally contain your website.
You also need a place to store your website’s files.
That service is called web hosting.
Web hosting provides server space where your website files, databases, images, scripts, and other resources can be stored.
When someone visits your domain, the hosting server delivers the required website files to their browser.
Simple Example
Think of building a physical shop.
- Domain name = shop address
- Web hosting = shop/building
- Website files = products and furniture inside the shop
- DNS = system that directs visitors to the correct shop
You generally need both a domain and hosting to create a traditional self-hosted website.
Domain vs Web Hosting
Many beginners confuse these two services.
| Domain Name | Web Hosting |
|---|---|
| Website address | Server space |
| Helps people find your website | Stores your website |
Example: example.com | Stores files and databases |
| Registered through a domain registrar | Purchased from a hosting provider |
| Usually renewed periodically | Usually billed according to the hosting plan |
They work together, but they are not the same thing.
What Is DNS?
DNS stands for Domain Name System.
DNS translates a domain name into information that internet services can use to locate the correct server.
For example:
yourdomain.com
can be configured so that visitors are directed to the server where your website is hosted.
DNS can contain different types of records, including:
- A record
- AAAA record
- CNAME record
- MX record
- TXT record
- NS record
You don’t need to understand every DNS record to connect a basic website.
For most beginners, the two most important methods are:
- Changing nameservers
- Adding an A record
What Are Nameservers?
Nameservers tell the internet which DNS service is responsible for your domain.
Your hosting company may provide nameservers similar to:
ns1.example-host.com
ns2.example-host.com
The exact nameservers depend on your hosting provider.
Never copy the example nameservers above into your domain settings.
You must use the actual nameservers provided by your hosting company.
Before You Start
Make sure you have:
1. A Registered Domain
You need to own or control the domain you want to connect.
2. A Hosting Account
You need an active hosting account or server.
3. Hosting Nameservers or Server IP
Your hosting provider should give you the DNS information required to connect your domain.
It may provide:
- Nameservers
- Server IP address
- DNS records
- Instructions for connecting your domain
Keep this information available before changing anything.
Method 1: Connect Your Domain Using Nameservers
Changing nameservers is often the easiest method for beginners when the hosting provider manages DNS for the domain.
The exact dashboard names can vary between registrars, but the general process is similar.
Step 1: Get Your Hosting Nameservers
Log in to your hosting account.
Look for a section such as:
- Account information
- Hosting details
- DNS
- Nameservers
- Server information
- Domain setup
Your hosting provider should show the nameservers assigned to your hosting account.
They may look similar to:
ns1.example.com
ns2.example.com
Again, these are only examples.
Use the exact values supplied by your hosting company.
Step 2: Log In to Your Domain Registrar
Now open the website where you purchased your domain.
This could be a domain registrar or another service that manages your domain.
Log in to your account and find your domain.
Look for an option such as:
Manage Domain
or
Domain Settings
or
DNS Settings
or
Nameservers
The wording differs between providers.
Step 3: Open Nameserver Settings
Find the nameserver section.
You may see the registrar’s default nameservers already entered.
Choose the option to use custom nameservers if your registrar provides one.
Then enter the nameservers supplied by your hosting provider.
For example:
ns1.example-host.com
ns2.example-host.com
Do not use those example values for your real website.
Step 4: Save the Changes
After entering the correct nameservers, save the changes.
Your domain registrar will then update the DNS delegation for your domain.
The change may not become visible everywhere immediately.
Step 5: Wait for DNS Propagation
One of the most confusing parts for beginners is DNS propagation.
After changing DNS settings, different internet providers and DNS resolvers may continue using previously cached information for some time.
As a result:
- Your website may work immediately for some people.
- It may still show the old destination for others.
- Your domain may temporarily fail to load.
- DNS-checking tools may show different results during the transition.
DNS changes can take time to propagate.
Don’t panic if your website doesn’t appear immediately after making a correct change.
Method 2: Connect Your Domain Using an A Record
The second common method is to point the domain directly to the IP address of your web server.
This is useful when you want to keep your existing DNS provider rather than changing the domain’s nameservers.
For example, your hosting provider may give you a server IP such as:
203.0.113.10
That is only an example IP address.
You must use the actual IP address provided by your hosting company.
Step 1: Find Your Hosting IP Address
Log in to your hosting account.
Find your server or hosting information.
Look for something such as:
Shared IP Address
Server IP
IPv4 Address
or
Account IP Address
Copy the correct address.
Step 2: Open DNS Management
Go to your domain registrar’s DNS management section.
You may see records similar to:
| Type | Name | Value |
|---|---|---|
| A | @ | Existing IP |
| CNAME | www | Existing value |
Your interface may look different.
Don’t delete records unless you understand what they do.
Step 3: Add or Update the A Record
Create or edit an A record.
A typical configuration for the root domain is:
Type: A
Name/Host: @
Value: Your hosting server’s IP address
TTL: Default/Automatic
For example:
@ → 203.0.113.10
The IP above is only an example.
Step 4: Configure the WWW Version
You also need to consider the www version of your domain.
For example:
yourdomain.com
and
www.yourdomain.com
are technically different hostnames.
A common configuration is a CNAME record:
Type: CNAME
Name: www
Target: yourdomain.com
This tells DNS that the www hostname should follow your main domain.
Your hosting provider may recommend a different configuration, so follow its instructions when available.
Nameservers vs A Records
Which method should you choose?
| Feature | Nameservers | A Record |
|---|---|---|
| Beginner friendly | Yes | Moderate |
| DNS managed by hosting provider | Usually | No |
| Requires server IP | Usually no | Yes |
| DNS managed at registrar | Usually no | Yes |
| Easy setup | Very | Moderate |
| More DNS control | Depends on provider | Yes |
For Beginners
If your hosting provider gives you nameservers and you want the simplest setup, changing the nameservers is often the easiest approach.
If you need to keep DNS management at your existing provider, using DNS records such as an A record may be more appropriate.
What Happens After You Point the Domain?
Once DNS is configured correctly, the connection generally works like this:
Visitor enters your domain
↓
DNS looks up the domain
↓
DNS finds the configured destination
↓
The browser connects to your hosting server
↓
The server sends your website files
↓
Your website appears in the browser
This entire process normally happens automatically in a fraction of a second once DNS is working correctly.
How to Know If Your Domain Is Connected
After making the DNS changes, open your domain in a browser.
Try:
Also check:
https://www.yourdomain.com
If your website loads correctly, the domain is probably connected.
However, a browser test alone isn’t always enough.
You can also check your DNS records using reputable DNS-checking tools or your registrar’s DNS management panel.
What If the Website Doesn’t Open?
Don’t immediately assume that you did something wrong.
There are several possible causes.
1. DNS Has Not Propagated
If you recently changed nameservers or DNS records, you may need to wait.
2. Incorrect Nameservers
Double-check that you entered the exact nameservers provided by your hosting company.
Even a small spelling mistake can prevent the connection from working.
3. Incorrect IP Address
If you’re using an A record, verify that you entered the correct server IP.
4. Domain Is Not Added to Your Hosting Account
Some hosting platforms require you to add the domain to the hosting account before the website can load.
Check your hosting control panel.
5. DNS Records Conflict
Multiple records can sometimes create an unexpected configuration.
Review your DNS zone carefully before deleting anything.
6. SSL Certificate Has Not Been Issued
Your domain may point correctly but HTTPS may not work immediately.
Your hosting provider may need to issue an SSL certificate.
What Is SSL and Why Do You Need It?
You may notice that websites use:
https://
instead of:
http://
HTTPS encrypts the connection between the visitor’s browser and the website.
A valid SSL/TLS certificate is important for modern websites because it helps protect information exchanged between users and the website.
Many hosting providers offer automated SSL certificates, but the exact process depends on the provider.
After connecting your domain, check that your website loads securely over HTTPS.
Common DNS Mistakes to Avoid
Don’t Copy Example IP Addresses
The IP addresses shown in tutorials are examples.
Always use the IP address assigned to your own hosting account.
Don’t Copy Example Nameservers
Every hosting provider can have different nameservers.
Use the ones provided specifically for your account.
Don’t Delete All DNS Records
Your DNS zone may contain important records for email, verification, and other services.
Changing nameservers or DNS records can affect services beyond your website.
Don’t Keep Changing Settings Every Few Minutes
If you’ve made a correct DNS change, give it time to propagate before making additional changes.
Repeated changes can make troubleshooting more difficult.
What Happens to Email When You Change DNS?
This is an important point that beginners often overlook.
Your domain may also be used for email.
For example:
contact@yourdomain.com
Email delivery commonly relies on MX records.
If you change nameservers, your DNS configuration may move to a different DNS provider.
If the required MX records aren’t configured there, your email service could stop working.
Therefore, before changing nameservers, check whether your domain is currently being used for email or other important services.
Domain and Hosting Setup Checklist
Before considering the setup complete, check the following:
- Domain is registered
- Hosting account is active
- Domain has been added to hosting
- Correct nameservers or DNS records are configured
- A record is correct if required
wwwis configured- DNS changes have had time to propagate
- Website loads on the main domain
- Website loads correctly over HTTPS
- Email records have been checked
- No important DNS records were accidentally deleted
Frequently Asked Questions
Can I buy my domain and hosting from different companies?
Yes. Your domain registrar and hosting provider do not have to be the same company.
You simply need to configure the DNS correctly.
How long does it take to point a domain to hosting?
The time can vary. Some DNS changes become visible quickly, while others may take longer because DNS information can be cached by different resolvers.
Do I need coding knowledge?
No. You don’t need programming knowledge to change basic domain DNS settings.
You do need to carefully follow the instructions from your registrar and hosting provider.
What is the easiest way to connect a domain?
For many beginners, using the nameservers supplied by the hosting provider is the simplest approach.
What is an A record?
An A record maps a hostname to an IPv4 address.
For example:
example.com → server IP
What is a CNAME record?
A CNAME record points one hostname to another hostname.
A common example is configuring:
www.example.com
to point to:
example.com
Will changing nameservers delete my website?
Changing nameservers doesn’t itself delete your website files from the hosting server. However, it changes where DNS queries are handled, so incorrect DNS configuration can make your website or other services unreachable.
Why does my domain show an error after I connected it?
Possible causes include incorrect DNS records, propagation delays, the domain not being added to the hosting account, SSL configuration problems, or server configuration issues.
Related TechAnees Guides
If you’re new to website development, continue learning with related guides on TechAnees:
- How to create a free blog website without writing code
- HTML basics for beginners
- CSS basics for beginners
- JavaScript basics for beginners
- WordPress tutorials
- Computer basics for beginners

About Techanees
Techanees is a technology platform sharing simple tutorials, useful guides, web development tips, and the latest tech updates for beginners and enthusiasts.