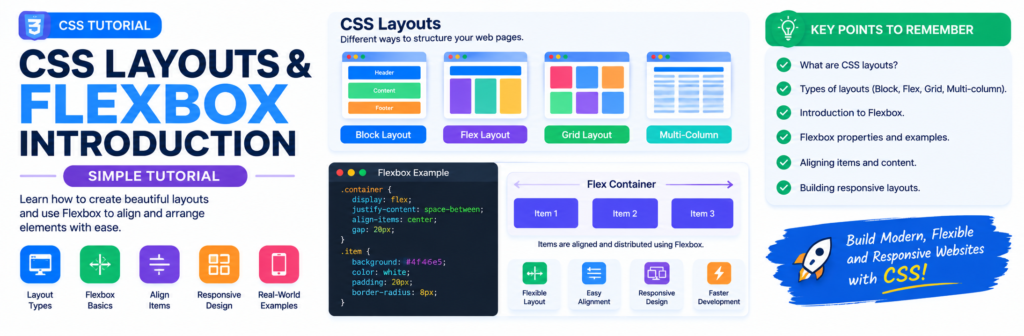
CSS Flexbox Tutorial for Beginners, Create Flexible and Responsive Layouts
Learn CSS Flexbox from the basics with simple explanations, practical examples, alignment techniques, responsive layouts, and a complete mini project.
When you begin designing websites with CSS, one of the first challenges you will face is arranging elements properly.
You may want three cards to appear in one row, a navigation menu to stay neatly aligned, a button to sit at the end of a section, or a group of items to move into multiple rows on smaller screens.
In the past, developers often relied on techniques such as floats, complicated positioning, or manually calculated margins. CSS Flexbox makes many of these layout problems much easier.
Flexbox, short for Flexible Box Layout, is a CSS layout system designed for arranging elements in one dimension—either as a row or as a column. It provides powerful tools for controlling alignment, spacing, sizing, and ordering..
What You Will Learn
By the end of this tutorial, you will understand:
- What CSS Flexbox is
- Why Flexbox is useful
- Flex containers and flex items
- Main axis and cross axis
- display: flex
- flex-direction
- justify-content
- align-items
- align-self
- gap
- flex-wrap
- flex-flow
- flex-grow
- flex-shrink
- flex-basis
- The flex shorthand
- order
- Centering elements
- Creating navigation bars
- Creating card layouts
- Building responsive layouts
- Combining Flexbox with media queries
- Common Flexbox mistakes
What Is CSS Flexbox?
Flexbox is a CSS layout model that makes it easier to arrange elements inside a container.
For example, suppose you have three boxes:
<div class="container">
    <div class="box">One</div>
    <div class="box">Two</div>
    <div class="box">Three</div>
</div>
Without Flexbox, the elements normally appear one after another according to the normal document flow.
We can turn the parent into a Flexbox container with:
.container {
    display: flex;
}
Now the direct children become flex items, and the browser lays them out using the Flexbox rules.
Live Code Example:
<div class="container">
    <div class="box">One</div>
    <div class="box">Two</div>
    <div class="box">Three</div>
</div>
.container{
       display:flex;
}
Flex Container and Flex Items
There are two important terms you should remember.
Flex Container
The parent element with:
display: flex;
is called the flex container.
Example:
.container {
    display: flex;
}
Flex Items
The direct children of the flex container are called flex items.
Example:
<div class="container">

    <div>Item 1</div>

    <div>Item 2</div>

    <div>Item 3</div>

</div>
Here:
.container = Flex Container

Item 1 = Flex Item
Item 2 = Flex Item
Item 3 = Flex Item
A very important point is that Flexbox applies to the direct children of the flex container.
Your First Flexbox Example
Let’s create a simple layout.
HTML
<div class="container">
    <div class="box">Box 1</div>
    <div class="box">Box 2</div>
    <div class="box">Box 3</div>
</div>
CSS
.container {
    display: flex;
}

.box {
    padding: 30px;
    border: 2px solid black;
}
The three boxes will now be arranged in a row because the default Flexbox direction is a row.
<div class="container">
    <div class="box">One</div>
    <div class="box">Two</div>
    <div class="box">Three</div>
</div>
.container{
       display:flex;
}
.box {
    padding: 30px;
    border: 2px solid black;
}
Understanding the Main Axis and Cross Axis
Before learning Flexbox properties, you need to understand two important concepts:
- Main axis
- Cross axis
The main axis is the direction in which the flex items are laid out.
The cross axis runs perpendicular to the main axis.
For example, with:
.container {
    display: flex;
    flex-direction: row;
}
the main axis is horizontal.
Main Axis →
─────────────────────────────
Box 1   Box 2   Box 3
The cross axis is vertical:
        Cross Axis
            ↓
        Box 1
        Box 2
        Box 3
When you change:
flex-direction: column;
the main axis becomes vertical.
This is extremely important because:
justify-content works along the main axis.
align-items works along the cross axis.
The flex-direction Property
The flex-direction property determines the direction in which flex items are placed.
The main values are:
flex-direction: row;
flex-direction: row-reverse;
flex-direction: column;
flex-direction: column-reverse;
row
This is the default direction.
.container {
    display: flex;
    flex-direction: row;
}
Items appear horizontally.
Item 1 → Item 2 → Item 3
row-reverse
.container {
    display: flex;
    flex-direction: row-reverse;
}
The items flow in the reverse direction.
column
.container {
    display: flex;
    flex-direction: column;
}
Items appear vertically.
Item 1
   ↓
Item 2
   ↓
Item 3
This is useful for vertical menus, forms, stacked cards, and mobile layouts.
column-reverse
.container {
    display: flex;
    flex-direction: column-reverse;
}
Items are arranged vertically in reverse order.
The justify-content Property
justify-content controls how flex items are positioned along the main axis.
For example:
.container {
    display: flex;
    justify-content: center;
}
This moves the items toward the center of the main axis.
Common values include:
flex-start
flex-end
center
space-between
space-around
space-evenly
justify-content: flex-start
.container {
    justify-content: flex-start;
}
Items are placed at the beginning of the main axis.
[1] [2] [3] empty
justify-content: flex-end
.container {
    justify-content: flex-end;
}
Items move toward the end.
empty [1] [2] [3]
justify-content: center
.container {
    justify-content: center;
}
Items are centered.
[1] [2] [3]
justify-content: space-between
.container {
    justify-content: space-between;
}
The available space is distributed between the items.
[1] [2] [3]
There is no additional space before the first or after the last item in the typical row example.
justify-content: space-around
.container {
    justify-content: space-around;
}
Space is distributed around the items.
justify-content: space-evenly
.container {
    justify-content: space-evenly;
}
The available space is distributed evenly between the items and the container edges.
The align-items Property
align-items controls the alignment of flex items on the cross axis.
Common values include:
stretch
flex-start
flex-end
center
baseline
For example:
.container {
    display: flex;
    align-items: center;
}
If your flex direction is a row, this commonly centers items vertically.
Centering Items
One of the most popular Flexbox techniques is:
.container {
    display: flex;
    justify-content: center;
    align-items: center;
}
This centers the items along both axes.
For example:
<div class="container">
    <div class="box">Hello</div>
</div>
.container {
    height: 300px;
    display: flex;
    justify-content: center;
    align-items: center;
}
The box will be centered horizontally and vertically.
This is one of the reasons Flexbox is so popular for UI layouts.
The gap Property
The gap property creates space between flex items.
Instead of adding margins to every item:
.container {
    display: flex;
    gap: 20px;
}
This creates a 20px gap between the flex items. Flexbox also supports row-gap and column-gap for controlling the two directions separately.
Example:
<div class="container">
    <div class="card">Card 1</div>
    <div class="card">Card 2</div>
    <div class="card">Card 3</div>
</div>
.container {
    display: flex;
    gap: 20px;
}
This is a clean and convenient way to create consistent spacing.
The flex-wrap Property
By default, flex items try to stay on one line.
If there isn’t enough room, you can allow them to move onto additional lines with:
flex-wrap: wrap;
Example:
.container {
    display: flex;
    flex-wrap: wrap;
}
Now the items can move to another row when the available width becomes too small.
This is especially useful for:
- Card layouts
- Product grids
- Navigation elements
- Image galleries
- Responsive components
nowrap
flex-wrap: nowrap;
This is the default behavior.
Items remain on one line and may shrink or overflow depending on their other sizing rules.
wrap
flex-wrap: wrap;
Items can move onto multiple lines.
wrap-reverse
flex-wrap: wrap-reverse;
Items wrap in the reverse cross-axis direction.
Combining flex-direction and flex-wrap
You can use both properties together:
.container {
    display: flex;
    flex-direction: row;
    flex-wrap: wrap;
}
This creates a horizontal Flexbox layout that can wrap onto additional rows.
The flex-flow Shorthand
Instead of writing:
.container {
    flex-direction: row;
    flex-wrap: wrap;
}
you can use:
.container {
    flex-flow: row wrap;
}
The syntax is:
flex-flow: direction wrap;
For example:
flex-flow: column wrap;
Flexbox Properties for Individual Items
Most Flexbox properties we have discussed so far are applied to the container.
However, some properties are applied directly to individual flex items.
Important item properties include:
flex-grow
flex-shrink
flex-basis
flex
order
align-self
Let’s understand them one by one.
The flex-grow Property
flex-grow controls how a flex item can grow when there is extra space available.
For example:
.item {
    flex-grow: 1;
}
Suppose you have:
<div class="container">
    <div class="item">One</div>
    <div class="item">Two</div>
    <div class="item">Three</div>
</div>
and:
.item {
    flex-grow: 1;
}
The items can share available extra space according to their grow factors.
If one item has:
.item:first-child {
    flex-grow: 2;
}
and the others have:
flex-grow: 1;
the first item gets twice the growth factor of each of the other items, assuming the same relevant basis and available free space.
The flex-shrink Property
flex-shrink controls how an item can shrink when there isn’t enough room.
For example:
.item {
    flex-shrink: 1;
}
The default shrink factor is generally 1.
You can prevent an item from shrinking by using:
.item {
    flex-shrink: 0;
}
Use this carefully because preventing shrinking can cause overflow on small screens.
The flex-basis Property
flex-basis specifies an item’s initial main-size before the available space is distributed through growing or shrinking.
Example:
.item {
    flex-basis: 200px;
}
This tells the browser to use 200px as the item’s initial main-size.
You can use values such as:
flex-basis: 200px;
flex-basis: 30%;
flex-basis: auto;
The flex Shorthand
Instead of writing:
.item {
    flex-grow: 1;
    flex-shrink: 1;
    flex-basis: 200px;
}
you can use the shorthand:
.item {
    flex: 1 1 200px;
}
A very common pattern is:
.item {
    flex: 1;
}
This is useful when you want multiple items to share available space.
The order Property
Flexbox allows you to visually change the order of flex items.
For example:
.item-one {
    order: 3;
}

.item-two {
    order: 1;
}

.item-three {
    order: 2;
}
The items will be laid out according to their order values.
The default order is:
order: 0;
Lower order values appear before higher values.
However, don’t use order carelessly to create a visual order that conflicts with the logical or accessible reading order of your HTML.
A good rule is:
Write your HTML in a meaningful order first, then use CSS for presentation.
The align-self Property
align-self lets you override the container’s align-items setting for an individual flex item.
Example:
.container {
    display: flex;
    align-items: center;
}

.item-special {
    align-self: flex-end;
}
Most items will be centered, while the special item will align toward the end of the cross axis.
Creating a Responsive Card Layout
Now let’s build something practical.
HTML
<div class="cards">

    <div class="card">
        <h2>HTML</h2>
        <p>Learn how to structure webpages with HTML.</p>
        <a href="#">Learn More</a>
    </div>

    <div class="card">
        <h2>CSS</h2>
        <p>Learn how to style beautiful and responsive websites.</p>
        <a href="#">Learn More</a>
    </div>

    <div class="card">
        <h2>JavaScript</h2>
        <p>Learn how to add functionality and interaction.</p>
        <a href="#">Learn More</a>
    </div>

</div>
CSS
.cards {
    display: flex;
    flex-wrap: wrap;
    gap: 20px;
}

.card {
    flex: 1 1 250px;
    padding: 20px;
    border: 1px solid #ddd;
    border-radius: 10px;
}
Here:
display: flex
creates the Flexbox container.
flex-wrap: wrap
allows the cards to move onto additional rows.
gap: 20px
creates consistent spacing.
flex: 1 1 250px
allows the cards to grow and shrink while using 250px as their initial basis.
This simple pattern is useful for course cards, blog cards, product cards, and many other website components.
Creating a Responsive Navigation Bar
Flexbox is excellent for navigation bars.
HTML
<nav class="navbar">

    <div class="logo">
        TechAnees
    </div>

    <div class="nav-links">
        <a href="#">Home</a>
        <a href="#">Courses</a>
        <a href="#">Blogs</a>
        <a href="#">Tools</a>
        <a href="#">Contact</a>
    </div>

</nav>
CSS
.navbar {
    display: flex;
    justify-content: space-between;
    align-items: center;
    padding: 15px 30px;
}

.nav-links {
    display: flex;
    gap: 20px;
}

.nav-links a {
    text-decoration: none;
}
The logo stays on one side while the navigation links occupy the other side.
Making the Navigation Responsive
For smaller screens, we can stack the navigation links.
@media (max-width: 600px) {

    .navbar {
        flex-direction: column;
        gap: 15px;
    }

    .nav-links {
        flex-direction: column;
        align-items: center;
    }

}
Now the desktop layout can be horizontal while the smaller-screen layout becomes vertical.
Flexbox can work together with media queries to create responsive layouts.
A Complete Flexbox Mini Project
Let’s combine everything into a small responsive course section.
HTML
<!DOCTYPE html>
<html lang="en">

<head>
    <meta charset="UTF-8">
    <meta name="viewport" content="width=device-width, initial-scale=1.0">
    <title>Flexbox Course Cards</title>
    <link rel="stylesheet" href="style.css">
</head>

<body>

    <header class="header">

        <h1>Learn Web Development</h1>

        <p>
            Choose a course and start learning today.
        </p>

    </header>

    <main class="courses">

        <article class="course">
            <h2>HTML</h2>
            <p>
                Learn webpage structure and HTML elements
                from the beginning.
            </p>
            <button>Start Course</button>
        </article>

        <article class="course">
            <h2>CSS</h2>
            <p>
                Learn styling, layouts, Flexbox, Grid,
                and responsive design.
            </p>
            <button>Start Course</button>
        </article>

        <article class="course">
            <h2>JavaScript</h2>
            <p>
                Learn programming concepts and create
                interactive webpages.
            </p>
            <button>Start Course</button>
        </article>

    </main>

</body>

</html>
CSS
* {
    box-sizing: border-box;
}

body {
    margin: 0;
    font-family: Arial, sans-serif;
    background: #f5f5f5;
}

.header {
    text-align: center;
    padding: 50px 20px;
}

.courses {
    width: min(1100px, 90%);
    margin: auto;

    display: flex;
    flex-wrap: wrap;
    gap: 20px;
}

.course {
    flex: 1 1 280px;

    padding: 25px;

    background: white;
    border: 1px solid #ddd;
    border-radius: 12px;
}

.course button {
    padding: 10px 18px;
    border: 0;
    border-radius: 6px;
    cursor: pointer;
}

@media (max-width: 600px) {

    .courses {
        flex-direction: column;
    }

}
This project demonstrates several important CSS concepts:
display: flex
flex-wrap
gap
flex
box-sizing
padding
border
border-radius
media queries
You can expand this project into a complete course page, product section, blog listing, or services section.
Flexbox vs Traditional Layout Techniques
Before Flexbox became widely used, developers often used floats, positioning, table-based layouts, or manually calculated spacing for certain layout problems.
Flexbox provides a layout model specifically designed for distributing space and aligning items in one dimension.
For modern websites, Flexbox is particularly useful for:
- Navigation bars
- Buttons
- Toolbars
- Card rows
- Form controls
- Headers
- Footers
- Centering
- Small UI components
- One-dimensional responsive layouts
For layouts that need simultaneous control of rows and columns, CSS Grid is often a better choice because Grid is a two-dimensional layout system.
Flexbox and CSS Grid
Flexbox and Grid are not competitors where one completely replaces the other.
A simple way to remember the difference is:
Flexbox
One dimension
Row
───────
A B C
or:
Column
A
B
C
CSS Grid
Two dimensions
A   B   C
D   E   F
G   H   I
Use Flexbox when you mainly need to arrange items along one axis.
Use Grid when you need stronger control over rows and columns together.
Many real websites use both.
Common Flexbox Mistakes
Mistake 1: Using justify-content When You Need align-items
Remember:
justify-content → main axis
align-items     → cross axis
If your direction changes from row to column, the physical direction controlled by these properties changes too.
Mistake 2: Forgetting display: flex
This will not create a Flexbox container:
.container {
    justify-content: center;
}
You need:
.container {
    display: flex;
    justify-content: center;
}
Mistake 3: Applying Flexbox to the Wrong Element
Remember that:
.container {
    display: flex;
}
affects the container’s direct children.
If your target elements are nested deeper, you may need to apply Flexbox to the appropriate parent.
Mistake 4: Using Too Many Margins
If you simply need consistent spacing between Flexbox items, consider:
gap: 20px;
instead of manually adding margins to every item.
Mistake 5: Forgetting flex-wrap
If cards are becoming too narrow, try:
flex-wrap: wrap;
This allows the items to move onto additional lines.
Mistake 6: Forgetting the Difference Between flex and flex-direction
These properties do completely different jobs.
flex-direction: row;
controls the direction of the layout.
flex: 1;
controls how an individual flex item participates in sizing.
The Most Important Flexbox Pattern
If you remember only one centering pattern from this tutorial, remember:
.container {
    display: flex;
    justify-content: center;
    align-items: center;
}
And if you need spacing:
.container {
    display: flex;
    justify-content: center;
    align-items: center;
    gap: 20px;
}
This combination is useful for countless UI components.
Frequently Asked Questions
What is CSS Flexbox?
Flexbox is a CSS layout model used to arrange elements in one dimension, either horizontally or vertically. It provides tools for alignment, spacing, and flexible sizing.
What is a flex container?
An element becomes a flex container when you use:
display: flex;
Its direct children become flex items.
What is the main axis?
The main axis is the primary direction in which Flexbox lays out its items. It is determined by flex-direction.
What is the cross axis?
The cross axis runs perpendicular to the main axis.
What does justify-content do?
It controls alignment and distribution of flex items along the main axis.
What does align-items do?
It controls alignment of flex items along the cross axis.
How do I center something with Flexbox?
Use:
display: flex;
justify-content: center;
align-items: center;
How do I make Flexbox items wrap?
Use:
flex-wrap: wrap;
What is the difference between Flexbox and Grid?
Flexbox is primarily a one-dimensional layout system, while CSS Grid is designed for two-dimensional layouts involving rows and columns.
Is Flexbox responsive?
Flexbox can create flexible layouts that adapt to available space. You can also combine Flexbox with media queries for layouts that change at specific viewport sizes.
Next Tutorial
CSS Box Model Explained Margin, Padding, Border and Box Sizing

About Techanees
Techanees is a technology platform sharing simple tutorials, useful guides, web development tips, and the latest tech updates for beginners and enthusiasts.
Very helpful tutorials
Nice
very detailed information
Amazing Content
nice blog
Beautifully designed
An incredibly well-written article.